


Beginner Level
Use Arduino without Internet to Control all your Electronic Devices
-Learners already enrolled
 Avg. Hours
 Contains Video
 CPD Accredited
 Certify Now

Certify Now
Confident you have the skills to certify without completing the course content?
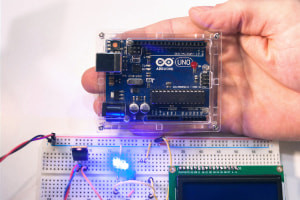
Use Arduino without Internet to Control all your Electronic Devices
This free online course teaches about the sensors and techniques involved in designing the Arduino Solar Tracker.
This exciting online course will show you how to make your own Arduino Solar Tracker. Following an easy step-by-step process, you'll learn to use light-sensitive sensors to track sunlight and direct the solar...This exciting online course will show you how to make your own Arduino Solar Tracker. Following an easy step-by-step process, you'll learn to use light-sensitive sensors to track sunlight and direct the solar panel towards the areas that increase its efficiency. The program is written using the Arduino IDE, an open-source electronics platform. Increase your Arduino Solar Tracking knowledge and skills by studying this comprehensive course.
COURSE PUBLISHER-

Start Course Now
Certify Now Certify Now
Confident you have the skills to certify without completing the course content?

 Total XP:
 Confident you have the skills to certify without completing the course content?
What You Will Learn In This Free Course
- -
- -
- -
- -
 Knowledge & Skills You Will Learn

Complete This CPD Accredited Course & Get Your Certificate!
![]()
Certify Your Skills
A CPD accredited Alison Diploma/Certificate certifies the skills you’ve learned![]()
Stand Out From The Crowd
Add your Alison Certification to your resumé and stay ahead of the competition![]()
Advance in Your Career
Share your Alison Certification with potential employers to show off your skills and capabilities


Learner Reviews & Feedback
Use Arduino without Internet to Control all your Electronic Devices
View More Reviews
Back to top
Back to course information
Want to create a customised learning path for your team?

Our dedicated Learning Advisors are here to help you curate a customised learning path tailored to your organisation's needs and goals.
Not sure where to begin?

Discover the career most suitable for you and get started in the field with a step-by-step plan.
Get your Plan


